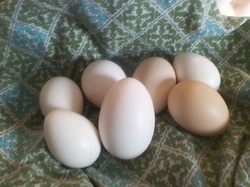
 After acquiring 14 peeps this past May, and sadly losing 7 to a raccoon, I find myself with 7 hens, 5 of which are a-laying...as the Christmas song says. I have finally exhausted my supply of store bought eggs and am thrilled to have an egg tray full of organic eggs, approximately 3 dozen of them. They range in size from 1-3/4" long to almost 3 " long, as the size of my hens vary, and the ones that have been laying longer produce larger eggs. When the recipe calls for 3 eggs, I scratch my head and wonder "which three?" Off to the internet. I know I will need more than 3 of my precious little gems, as 90% of them are smaller than the store-bought large eggs I have purchased for years. Also, the hens we had a few years ago were a common variety that produced large eggs pretty consitsently, so I was not faced with this problem.
My internet research was pretty consistent with the following:
1 extra large egg = 4 tablespoons
1 large egg = 3-1/4 to 3-1/2 tablespoons
1 medium egg = 3 tablespoons
Other helpful information found:
3 whole eggs = 1/2 cup
1/2 egg = 4 teaspoons
So I will crack my eggs until I get the 1/2 cup needed for my triple batch of sugar cookie dough.
I was planning on making 3 quiche, as it will be a busy week with violin practice for the Christmas party on Saturday, a scrapbook workshop, our churches community group, the homeschool mother's tea at a local tea house, and a 31 party. (if you don't know what a 31 party is go to www.thirtyonegifts.com though I am not a "purse" addict, I was smitten with their selection of practical bags and other gifts, which can be personalized.) Back to the quiche....I need 4 eggs for a quiche, and since 3 eggs is 1/2 cup, I will convert the 1/2 cup to 3/6 cup (thank you Mr. Dempsy for teaching me why I need to learn fraction conversion) and since I need one more egg (one third more than the 3 cup=1/2 cup) I add one third more to get 4/6 = 2/3. I will be sure to write down all of my egg conversions inside of my #1 most important cookbook...the one wtih recipes from mom, grandmom, sister, mother-in-law, etc. I also write all of the conversions and substitutions I have had to use over the years.
Maybe my hens will start laying eggs all the same size....large...but I kind of like the variety of sizes and delicacy of the little ones. And just think of the egg heads I can come up with using the tiny ones....
 After watching a program on television featuring a diner that made 8 oz burgers topped with cheese and jalapeno peppers, my husband and I made a spontaneous visit to Five Guys to get one for ourselves. That didn't quite satisfy my burger craving, however, so last night burgers were on the menu. The meat came from the only place I purchase ground beef anymore, Kingsville Market, on Rt. 1. The last time I purchased ground beef at some place other than the market I ended up with a broken molar requiring a crown, and becaue I didn't save the piece of bone that caused the infraction, I had to foot the bill myself. Two things resulted; the purchase of dental insurance, and the promise to never buy my ground beef anywhere but "The Market" as we call it, ever ever again. They grind the meat themselves, and will even custom grind it for you, if you prefer it from a different cut of meat than what they have on hand.
The meat was generously salted, and I mixed in a bit of burger seasoning that consisted of black pepper, chili pepper, onion, red bell pepper, sugar, garlic, and salt. This is an all natural blend made by a local spice company. Two of the burgers were stuffed with blue cheese. I did this by taking the amount of meat I use for one burger...between 1/4 and 1/3 pound....and dividing it in half. Each half was flattened to a 1/4 inch thickness, and I crumbled a tablespoon or so of blue cheese between them, pinching the edges to seal them together.
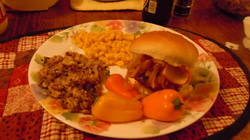
My boys love French fried onions on their burgers, so I tossed some sliced onions (1/8"?) in flour and a bit of salt, and browned them in a butter/oil mix...just enough to cover the bottom of a pan, but not quite a deep fry....When the onions were golden, I transferred them to a paper-towel lined bowl. The residual flour oil mixture was removed from the pan and the burgers were added. We like ours with pink in the middle, and feel safe eating them this way because I trust the butchers at "The Market" to provide good quality meat. Once out of the pan, the burgers were topped with Meunster cheese...all but one, as my youngest prefers American cheese. We added our French fried onions and condiments of our choice..Tobasco spicy ketchup to mayonaise being the favorites around here.
The burgers were accompanied by whole sweet peppers, yellow corn, and Lundberg Wild Blend...my very favorite rice. I'm not sure, but I think my burger craving has been satisfied....but I might have to wait until I see another cooking show featuring burger joints, just to be sure.
http://www.youtube.com/watch?v=KUNq2bmzhLk
Here's a little tutorial on making chicken fingers....
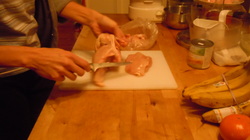 If you are making them from chicken breasts with skin, on the bone, start by pulling the skin off, cutting the membrane as you go...
 Use a boning knife, if you have one. The blade is thin and long...perfect for getting between the skin and bone. Start at the thin side of the breast and slowly pull the meat back as you cut it free from the bone. Sometimes I can manage to get most of the meat off with my fingers, working slowly to detach it from the bone.
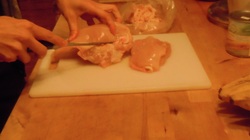
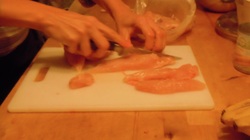 Once the meat is off of the bone, cut it into strips. They will most likely be wedge shaped, due to the shape of the breast meat, but that is okay. The thickest part should be no wider than 1-1/4"...
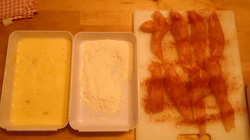 Season with whatever you like. I used paprika, salt, and pepper. Mix together equal parts egg and milk in one dish, and put some flour in the other.
Dredge the strips in flour, and then in egg, then in flour again...
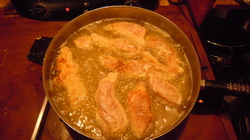 Heat 3/4" of oil in a skillet over high heat, about 375 or 400 degrees (my skillet is older, so the temp may be off a bit). Test the oil with a little piece of bread first. You want it to sizzle but not pop. Once the oil is hot, lay your strips in there and let them cook until you can see the edges are getting done, then flip them over. Once both sides are browned, they should be done, but take one out to test it first. Cut it in half at the thickest point. The strips take between 15-20 minutes to cook.
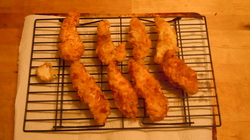 Drain the strips for a few minutes on a cooling rack that has been placed over paper towels. If you have to cook the strips in batches, keep a cookie sheet with a cooling rack on it in the oven at 175 or 200 degrees....or preferably on the "warm" setting, if your oven has one. Do not use paper towels if you keep them warm in the oven.
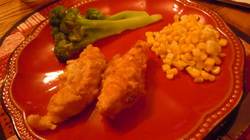 Serve with your favorite sauces. We use barbeque and honey mustard. You can make your own barbeque by adding brown sugar to ketchup or tomato sauce, with a few drops of Liquid Smoke. I add honey to prepared mustard until it is to my liking. I prefer to serve double veggies and cut out the starch! Enjoy!
I love to cook, but unfortunately, I have found myself in a situation where I have a somewhat incomplete kitchen. It consists of an island, two wall ovens, a double-burner hotplate, and an electric frying pan, which has saved me. I have a few random pieces of furniture that serve as storage for cookbooks, dishes, and other things which would usually live in cupboards. I do have a dishwasher and cook top, but they are still in their boxes. It won't be possible to put them into use until the cabinets are put in. Oh, and the kitchen sink? It is in the basement in a box, so for now I use the utility sink in the laundry room. Just when we seem to put away enough money to get somewhere, my work load is cut back, or something unforeseen happens. But the purpose of today's blog is not to gripe. I have gotten quite used to my half-kitchen and although it takes quite a while to heat my large stock pot, I manage. I do catch myself daydreaming at times....just thinking about washing dishes in the kitchen, rather than walking them to the laundry room gives me goose bumps!
This situation has not stopped me from cooking for friends and family, though I often feel as if I have a hand tied behind my back. I have learned short cuts, and also have become really good at a few things ....figuring out what I can cook ahead of time, boiling potatoes in the least amount of water possible, as it takes some time for a pot of water to come to a boil, and narrowing down my tools, since there isn't room for everything. I am figuring when I do get this kitchen completed, I will be able to do things in record time! There is a bright side to everything, and I believe, a purpose for every situation. I love watching visitors when they go to put a glass in the sink. One lady literally spun in circles looking for it, and the puzzled look when she couldn't find it was priceless. And it is humbling. Cooking is one of my passions, and I can't wait to dive in with both hands....but in the meantime I am cooperating joyfully, most of the time. With one hand behind my back.
2 cups packed fresh basil leaves
1/2 cup olive oil
1/2 cup pine nuts or walnuts
1/2 cup Parmesan or Romano cheese, grated
2 or 3 cloves garlic, crushed
salt and pepper to taste
Put the basil and nuts in the food processor. Walnuts will need to be chopped a bit first. Pulse the leaves and nuts until chopped coarsely. Add garlic and pulse some more. Slowly pour the olive oil in , as you continue to run the processor. Add the cheese last, scraping down the sides of the bowl, and season with salt and pepper, to taste.
Serve with pasta, or spread on slices of toasted bread, crackers, bagels.
|
 RSS Feed